- Welcome to Bespoke Cutter And Tailor.
Recent posts
#21
Drafting, Fitting and Construction / Re: Adjusting for erect postur...
Last post by Gerry - July 09, 2025, 06:00:27 AMQuote from: Robb on July 09, 2025, 05:16:17 AMMarked in blue is how the waistband can sit flat with no ease given but it's tight. If I add any sort of ease to the waistband is will sag down in the back as shown in green where it will sit naturally.
Firstly, waistbands shouldn't have ease, not unless you intend to wear braces/suspenders; and obviously that is something to consider - it would enable you to bring up the level of the waistband in the back, making things look more balanced/even.
Waistbands are usually cut net, or slightly smaller than the circumference measured. They're meant to fit snuggly (which is different from tight). Obviously you don't like the feel of that, so ... If you reduce the width of your waistband, and increase the rise a little to compensate for the reduction, that might feel more comfortable. You'll have the pleated front a little higher up, relatively speaking; and with a band that's narrower, its lower edge won't cut into your abdomen so much. Hopefully those two things together will enable a snugger waistband that is more palatable.
Having curvature to your abdomen is not the same as having a stout figure. I really don't see the need for any adjustment.
#22
Drafting, Fitting and Construction / Re: Adjusting for erect postur...
Last post by Robb - July 09, 2025, 05:16:17 AMQuote from: peterle on July 08, 2025, 08:05:05 PMI also want to adress the waistband. It is very slanted. Very high at the front and dipping at the back. Do you want it that high in the front? You said you did a stout figure alteration wich usually consists of adding width and raising the fly point.A pic of the front alteration would be nice. Lowering the waistline towards the fly point will most likely improve the run of the waistband.
Those are valid concerns and I can understand the confusion. I made a sideview sketch of my body contour that I have to work with to give a better idea of why it's so high in the front and is dipping in the back.
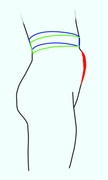
Marked in blue/green is the position where I'd like the waistband to sit at the front. Just below it, my stomach protrudes at a right angle and marked in red is where my ostomy sits, which is a no-go zone for any waistband to sit and needs extra room (hence I thought pleated trousers would be ideal for this). So it can only really sit above it as marked or well below it but then I'd have an unsightly long chest and makes it impossible to wear waistcoats.
Marked in blue is how the waistband can sit flat with no ease given but it's tight. If I add any sort of ease to the waistband is will sag down in the back as shown in green where it will sit naturally. Much like how it sits in the toile picture earlier posted. It's also much more comfortable than the blue position.
Quote from: Gerry on July 09, 2025, 12:09:19 AMI'm not sure why you tackled a stout figure adjustment, either. Personally, I think you'd be better off with a regular draft.Marked in red is why I thought I could benefit from a stout adjustment shown below, to give that area some extra room. Sadly, the stout adjustment makes the front fly come straight up and not curve inwards following my contour.
I'm still thinking if maybe a seat piece would work better so the 'waistband' could sit lower in the back while the extra height of the seat piece balances out the look.
#23
Drafting, Fitting and Construction / Re: Adjusting for erect postur...
Last post by Gerry - July 09, 2025, 12:09:19 AMI had a little time to check the Modern Tailor draft. For the underside, the seat line is constructed so:
Measure across the topside from 7 to A ... place this amount at L and continue to 24, 1/2 seat [sic: scale, surely?] measure plus 2 1/2"
7 to A is the same as 4 to 1: 1/3rd scale plus 1/6th scale = 1/4 total seat measurement. So basically 2.5 inches of ease is added to the pattern, giving 5 inches of ease across the whole seat. That is way too much for many, let alone your build. Because of your flatter backside, you'd probably only need 1 inch on the pattern (to match the 1 inch pleating ease added to the front's side seam at point 24); which would give you 2 inches of ease across the whole seat.
You'll know yourself how much you had to take in at the CB, which will give you a better idea of how much ease you actually need; but basically it would be better (IMO) to redraw the back pattern with significantly less ease. Following on from what Peterle was saying, if you take everything off the CB it disrupts the whole balance.
I'm not sure why you tackled a stout figure adjustment, either. Personally, I think you'd be better off with a regular draft.
#24
Drafting, Fitting and Construction / Re: Adjusting for erect postur...
Last post by peterle - July 08, 2025, 08:05:05 PMFirst I like the unpinned version much better. The fronts fall much nicer and the waistband is a bit more horizontal although a bit strange. A slight looseness under the seat is necessary for every trousers, otherwise sitting and stepping stairs will be difficult. Also the pinned horizontal dart is much too high wich throughs off the whole balance completely. The darts should start at point 24 and rise a little towards the seat seam. And it should take out a lot less.
I also want to adress the waistband. It is very slanted. Very high at the front and dipping at the back. Do you want it that high in the front? You said you did a stout figure alteration wich usually consists of adding width and raising the fly point.A pic of the front alteration would be nice. Lowering the waistline towards the fly point will most likely improve the run of the waistband.
The green line in your posted diagram shows you took out a very lot at the seat seam. This had two consequences: it reduced the back hip width and produces a very vertical seat seam run. Both is probably necessary. But it throughs off the balance.
My approach would be: starting with the original seat seam line I would reduce the whole seat slant with a dart like your first alteration diagram. (Starting at point 24!)This alters the whole top back angle, not just the seat seam angle. Then in another fitting I would determin wether I have to reduce the back hip width also by pinning a long vertical dart along the crease line. The pattern would be altered by slashing the undersides vertically and pinching the surplus.
#25
Drafting, Fitting and Construction / Re: Which Drafting System Do Y...
Last post by Schneiderfrei - July 08, 2025, 09:44:08 AMQuote from: Greger on July 08, 2025, 06:05:34 AMThe Modern Tailor Outfitter And Clothier III, pages 132 and 133. Chapter XIII
Thank you very much Greger.
#26
Drafting, Fitting and Construction / Re: Which Drafting System Do Y...
Last post by Greger - July 08, 2025, 06:05:34 AMQuote from: Schneiderfrei on July 07, 2025, 07:06:11 PMQuote from: Greger on July 07, 2025, 05:34:10 PMThere are a few fitting answers for tall neck, short neck, stooped and erect stance missing.
Oh Greger, do you know where those aditional instructions might be found?
The Modern Tailor Outfitter And Clothier III, pages 132 and 133. Chapter XIII
The download copy I have is barely readable.
That chapter has pajamas, dressing gown and underwear.
#27
Drafting, Fitting and Construction / Re: Which Drafting System Do Y...
Last post by jruley - July 08, 2025, 05:05:18 AMQuote from: Sam Tyler on July 07, 2025, 11:22:44 PMI'm really looking for a complete system, not bits and bobs. That way when I know how to adjust one garment from the system I should know more how to adjust another garment in the same system.
Understood, I was after the same thing once. Some things may carry over from garment to garment but it can't be reduced to a cookbook procedure. Changes in style can affect the fit of a garment, so be prepared to do some tweaking on each new pattern - even if they all came from the same book.
#28
Drafting, Fitting and Construction / Re: Which Drafting System Do Y...
Last post by Schneiderfrei - July 08, 2025, 12:46:09 AMMy Mueller shirt draft is from the 2000's.
I would not like to post the draft up here because of copyright issues.
The draft is very 3D shaped to the bodice, and even has 3 different degrees of closenes to the figure. This is very different from the pre 1990's drafts which are more or less an enveloupe.
I really recommend Hemden Schnitttechnik. My shirts made from this draft look a lot more like modern shirts. In fact I would be totally unsurprised to find that Mueller provides drafts to manufacturing companies, especially those that do not pinch them without permission.
#29
Drafting, Fitting and Construction / Re: Which Drafting System Do Y...
Last post by Sam Tyler - July 07, 2025, 11:25:59 PMQuote from: TTailor on July 07, 2025, 11:20:25 PMMuller et sohn often sell individual patterns and drafts from the magazine or from their full books.
I would look there and consider metric pattern cutting for menswear. Its a beginner friendly book.
Thanks. I'll check it out, although it may be a bit before I can share some results here. Big storm here yesterday did some damage sw of town so I may have some work coming in.
#30
Drafting, Fitting and Construction / Re: Which Drafting System Do Y...
Last post by Sam Tyler - July 07, 2025, 11:22:44 PMQuote from: jruley on July 07, 2025, 11:04:18 PMBuying the latest edition of Rundschau probably just gets you the most contemporary style. There should be some older Rundschau drafts available for free here on the forum that would be fine for a starting point (no, I haven't looked).
I'm really looking for a complete system, not bits and bobs. That way when I know how to adjust one garment from the system I should know more how to adjust another garment in the same system. I just want to know I'm not the only one on here using it.