- Welcome to Bespoke Cutter And Tailor.
Recent posts
#1
The Apprentice's Forum / Re: Problems altering sport co...
Last post by Gerry - Today at 05:18:00 PMFirstly, I'm not a coat maker (wait for more experienced voices). It's common to measure from either the thumb to cuff (of suit) or forefinger to cuff, or both, and even things up. Example here (22 min mark):
https://www.youtube.com/watch?v=0E8IdvIqjEU&t=1320s
The majority of the time we go about our day with our arms by our sides, so that's the position you need to evaluate. Some people like a shorter sleeve on the arm where they wear a watch, so that they can show it off, so asymmetry can be very deliberate. Sleeves can also look very different depending on what shirt was worn during a fitting.
Because everyone is so focused on the sleeve length, any difference/alteration is going to be magnified and overly scrutinised. If you weren't looking, you probably wouldn't notice, so things might not be as off as you think. Take photos during fittings so that you can evaluate things in the cold light of day.
#2
The Apprentice's Forum / Problems altering sport coat s...
Last post by Amb0925 - Today at 10:07:05 AMHad to copy my post here because I'm not sure if it was in the right place before.
Hi everyone! Hoping for some advice. I am new to the game and just doing alterations from my home for now.
I had a man come in to have his sleeves taken up a few inches on a sport coat. He informed me that one of his arms may be shorter than the other, because he knows one of his legs is shorter than the other. I decided then to measure each sleeve individually to see how much to take up rather than trying to make the sleeves match. I did not measure his arms to compare them which may have been my first mistake. I also measured them based on the amount of the shirt sleeve that was visible under the coat sleeve, rather than measuring based on distance from the thumb or wristbone. Perhaps that was also a mistake; it was the only method I could find when looking into how to fit the sleeves but I think it was a bad idea in retrospect.
Once I got to work on it I realized that my mark for one arm was a full inch higher than the other arm (one needed to come up 2 inches and the other 3 inches), and his arms were not noticeably uneven so I didn't think it could be right. I asked him to come for a second fitting (embarrassing) to see if it looked right. It did not. We agreed that the shorter one needed to be about a half inch longer than originally planned, so one arm needed to be taken up 2 inches and the other 2 1/2 inches. Hopefully this is clear thus far.
I got the alteration finished, buttons on, coat pressed and they came in to pick it up. When he tried it on, I could tell that his wife was not satisfied. Something looked off to me as well. But the problem is, one minute it looked as if the left sleeve was slightly too long, and the next minute, the right sleeve looked longer than the left. The shirt he was wearing underneath had sleeves that were also a bit too long, so trying to measure based on the amount of shirt fabric peeking out did not work, as he could lift his arms, bring them back down, and there would be an extra inch of shirt sleeve down his hand. So I had him pull the sleeves of his shirt up where we could not see them and looked instead at where the sleeves hit his wrists. Once again, one minute it looked perfect, but every tiny movement he made changed it.
Finally I measured from the tip of his thumb to the cuff, and this distance was 1/4 inch longer on the right arm, suggesting that the left arm was 1/4 inch too long. I did not think to have him move his arms and bring them back to his sides and measure again; I think I probably would have gotten something different each time based on how things were going with the eyeball method. I told them I'd take another 1/4 inch off the left sleeve, they were understanding but we all left the interaction a little disappointed (he had hoped to wear it to a meeting tomorrow but would have to choose something else, and I was looking forward to moving on to other projects).
As soon as they left, I began to wonder if it would actually be worthwhile taking 1/4 inch from the left sleeve. Would I have gotten a different measurement as soon as he moved? Is there a more concrete standard I can appeal to? I dont even know at this point whether taking the left sleeve up 1/4" is the right choice if it is just an issue of his posture in that moment. Can someone explain everything I did wrong and what I should do now? Thank you if you have read this far.
#3
Drafting, Fitting and Construction / Trouble altering sport coat sl...
Last post by Amb0925 - Today at 08:56:24 AMHi everyone! Hoping for some advice. I am new to the game and just doing alterations from my home for now.
I had a man come in to have his sleeves taken up a few inches on a sport coat. He informed me that one of his arms may be shorter than the other, because he knows one of his legs is shorter than the other. I decided then to measure each sleeve individually to see how much to take up rather than trying to make the sleeves match. I did not measure his arms to compare them which may have been my first mistake. I also measured them based on the amount of the shirt sleeve that was visible under the coat sleeve, rather than measuring based on distance from the thumb or wristbone. Perhaps that was also a mistake; it was the only method I could find when looking into how to fit the sleeves but I think it was a bad idea in retrospect.
Once I got to work on it I realized that my mark for one arm was a full inch higher than the other arm (one needed to come up 2 inches and the other 3 inches), and his arms were not noticeably uneven so I didn't think it could be right. I asked him to come for a second fitting (embarrassing) to see if it looked right. It did not. We agreed that the shorter one needed to be about a half inch longer than originally planned, so one arm needed to be taken up 2 inches and the other 2 1/2 inches. Hopefully this is clear thus far.
I got the alteration finished, buttons on, coat pressed and they came in to pick it up. When he tried it on, I could tell that his wife was not satisfied. Something looked off to me as well. But the problem is, one minute it looked as if the left sleeve was slightly too long, and the next minute, the right sleeve looked longer than the left. The shirt he was wearing underneath had sleeves that were also a bit too long, so trying to measure based on the amount of shirt fabric peeking out did not work, as he could lift his arms, bring them back down, and there would be an extra inch of shirt sleeve down his hand. So I had him pull the sleeves of his shirt up where we could not see them and looked instead at where the sleeves hit his wrists. Once again, one minute it looked perfect, but every tiny movement he made changed it.
Finally I measured from the tip of his thumb to the cuff, and this distance was 1/4 inch longer on the right arm, suggesting that the left arm was 1/4 inch too long. I did not think to have him move his arms and bring them back to his sides and measure again; I think I probably would have gotten something different each time based on how things were going with the eyeball method. I told them I'd take another 1/4 inch off the left sleeve, they were understanding but we all left the interaction a little disappointed (he had hoped to wear it to a meeting tomorrow but would have to choose something else, and I was looking forward to moving on to other projects).
As soon as they left, I began to wonder if it would actually be worthwhile taking 1/4 inch from the left sleeve. Would I have gotten a different measurement as soon as he moved? Is there a more concrete standard I can appeal to? I dont even know at this point whether taking the left sleeve up 1/4" is the right choice if it is just an issue of his posture in that moment. Can someone explain everything I did wrong and what I should do now? Thank you if you have read this far.
#4
Drafting, Fitting and Construction / Re: Shirt *Construction* techn...
Last post by Gerry - May 31, 2025, 06:53:06 AMQuote from: Hendrick on May 31, 2025, 06:36:46 AMPersonally I'm no great fan of "overautomated" shirts. They look to "flat" to me, collars too stiff and flat. I also think that most shirts are stitched up with too much thread tension, causing puckering seams that are difficult to iron. So I don't see the use of mimicking industrial production in a handmade shirt (or any other garment for that matter).
Very good points Hendrick, and to a certain extent I agree with you (especially about the collars). I'm sure there's a happy medium though. I periodically see some shoddy work from big names and considering the prices they charge they should do better.
I get it, time is money, so they're not going to do stuff like basting etc; but perhaps a little investment in modern tech (at least for some stages of production) wouldn't go amiss. And many well known 'bespoke' companies already use the techniques of industrial production for their 'handmade' shirts ... production as it was in the middle of the last century, that is. Sometimes I'm not that impressed with the results. If they've already gone down that route, they might as well go the whole hog.
As mentioned, I think tailors often make the best shirts. Or small time makers who take the time to do what's necessary.
#5
Drafting, Fitting and Construction / Re: Shirt *Construction* techn...
Last post by Hendrick - May 31, 2025, 06:36:46 AMQuote from: Gerry on May 30, 2025, 04:55:38 PMQuote from: Hendrick on May 30, 2025, 08:34:54 AMThat, and the fact that the "hand of the maker" is obviously missing in an automated shirt of course...
Content warning: minor rant ahead.
Bypassing the hand of the maker isn't always a bad thing, frankly!I follow a well known shirt manufacturer on X. Last year they posted a tweet about a cuff they're famous for accompanied by a publicity photo. After expanding the image I noticed that the top-stitching was abysmal. Said shirt was several hundred pounds.
Personally, I find some of the 'name' shirtmakers a bit of a con. They take great pride in the fact that they use single-needle machines for every stage of production; though some of the techniques they use, I would put in the 'quick-and-dirty' category. Somehow, using industry-standard (as in ready-to-wear) work practices from the middle of the last century is virtuous. They're basically saying that they're too backward-thinking to invest in modern technology.
I can understand that mentality from smaller makers because they don't have the cash to invest in expensive machinery; but the larger 'bespoke' brands would really benefit from rethinking their production methods. They could offer better-made shirts at a much cheaper price; yet they would still have the edge in terms of fit and quality of raw materials. They make a 100% machined product anyway, so they have nothing to gain by living in the past.
Were I a consumer, I'd go to a tailor to make my shirts. A tailor is more likely to put in the work: the care and attention needed to produce a beautiful end-result. Though even then some fall at the last hurdle by not pre-shrinking cloth properly.
Shirt-making is a very grey area. A lot of consumers are getting ripped off one way or another.
More than 30 years ago I worked with a french shirtmaker to develop men's shirts. I remember I used a picture of Robert Oppenheimer wearing a shirt with a beautiful collar and another with a button down collar. I took 5 shirts, made in a 3- (yes three) ply poplin, "triple retors" in french. Indestructible, my son still wears these today...
Personally I'm no great fan of "overautomated" shirts. They look to "flat" to me, collars too stiff and flat. I also think that most shirts are stitched up with too much thread tension, causing puckering seams that are difficult to iron. So I don't see the use of mimicking industrial production in a handmade shirt (or any other garment for that matter).
Cheers, Hendrick
#6
The Apprentice's Forum / Re: Shirt fitting
Last post by Gerry - May 31, 2025, 01:53:42 AMQuote from: EvanTA on May 30, 2025, 11:34:56 PMI also have the Don McCunn book which didn't serve me well in making trousers, but maybe his shirt pattern is better.
That's not a bad method because it's very intuitive and uses one's own measurements. The caveat is that McCunn's system for a basic top/sloper is quite fitted, whereas a shirt is going to be a looser fit.
His method for determining the shoulder angle and drawing the neck is all good. Just take measurements for both sides to combat asymmetry. However, with the torso it's better to think of it as a cylinder with ease added in the case of a shirt; then literally draw it as a (rectangular) block. This assumes a 'regular' build - which you have (your photos show that you're not carrying extra pounds). Curvature of the side seams, and addition of darts etc, can all be done later to add shape.
In the case of someone who is slim(ish) then often there is little difference between the chest and seat measurement. The larger of the two can be used for the torso's circumference measurement to create our block. We just add the appropriate amount of ease to that measurement for the desired outcome and use it at all points (chest, waist and seat). This is how shift-dresses are typically designed. But the same principle applies to shirts: 'straight-up-straight-down' over the body, add shape in a fitting.
As a rule of thumb, if someone has a slight build, or if a fitted look is required for an average build, then 4 inches of ease is added to the torso circumference. 6 inches gives a more relaxed feel (though not baggy) for most. 8 inches for a loose fit, or if someone is on the heavier side. Go with 6 inches of ease would be my advice.
The hems of dress shirts are taken down to the crotch line. Casual shirts down to the seat/top of the pubic bone. Follow the above guidelines and McCunn's system is as good as any other. Edit: though the sleeve stuff didn't do it for me: a short cap is required rather than a more fitted draft. Plus the armscye shaping is questionable: the 'cross chest' measurement above the apex line, from the middle of the arm joint to the CF, needs some ease. Likewise the cross shoulder measurement on the back. IIR, it's all exactly fitted in McCunn's book.
#7
The Apprentice's Forum / Re: Shirt fitting
Last post by Gerry - May 31, 2025, 01:34:42 AMI agree with peterle. Although it would be a trivial matter to knock what you have into shape, you'll have a more accurate pattern (system permitting) if you learn to draft from scratch.
#8
The Apprentice's Forum / Re: Shirt fitting
Last post by Hendrick - May 31, 2025, 01:33:11 AMQuote from: Schnquote author=Schneiderfrei link=msg=13630 date=1748558554]eiderfrei link=msg=13630 date=1748558554]
Ok, thank you for that. You can't really do alterations for sway back in this case, since that sort of consideration needs to be done at the drafting stage.
It's sound logic to me to do a yoke on a muslin in order to avoid distortion in the cloth, although it does mean a bit of extra work. If the muslin cloth were stiffer, and you worked quickly and carefully, you wouldn't need to do that.
Before going on to the collar and stand, I am bothered by the ripples on the left front. Are they just a button placement problem? If not you will need to re-think the left front, because there are also ripples evident out at the scye/armhole. I would recommend starting by checking the button placement, even go as far as removing them and starting again.
At this point I would like to point to posaune's recommendation - 'work your muslin until it's dead!'
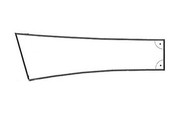
Is your collar pattern exact? The bottom edge of your piece is straight. Often the bottom edge of the collar is curved slightly, as in the diagram below. As it stands (pun observed) that could account for the excess cloth that distorts the collar as we see it now.
Ok, thank you for that. You can't really do alterations for sway back in this case, since that sort of consideration needs to be done at the drafting stage.
It's sound logic to me to do a yoke on a muslin in order to avoid distortion in the cloth, although it does mean a bit of extra work. If the muslin cloth were stiffer, and you worked quickly and carefully, you wouldn't need to do that.
Before going on to the collar and stand, I am bothered by the ripples on the left front. Are they just a button placement problem? If not you will need to re-think the left front, because there are also ripples evident out at the scye/armhole. I would recommend starting by checking the button placement, even go as far as removing them and starting again.
At this point I would like to point to posaune's recommendation - 'work your muslin until it's dead!'
Is your collar pattern exact? The bottom edge of your piece is straight. Often the bottom edge of the collar is curved slightly, as in the diagram below. As it stands (pun observed) that could account for the excess cloth that distorts the collar as we see it now.
[/quote]
The way I learned is to mirror collar stand and collar (to a point at 1/3rd of the front neck) vertically. The standard was dropping the collar band 7mm at centerback and raising the collar 7mm at centerback).
Shirts were worn more formal then I suppose...
Cheers, Hendrick
#9
The Apprentice's Forum / Re: Shirt fitting
Last post by peterle - May 31, 2025, 12:48:03 AMOK, I see.
Copying from a shirt is not that easy, because you can't see the details like darts ecc and it is easy to distort all the angles and curved lines. You need a plaid shirt to recognise all these details precisely.
A drafted pattern is surely easier to work with, because you have all the necessary lines.
#10
The Apprentice's Forum / Re: Shirt fitting
Last post by EvanTA - May 30, 2025, 11:34:56 PMThis is all very helpful, thank you. Until now I hadn't really wrestled much with pattern corrections for shirts so there are some good ideas in here I need to ingrain.
The original casual shirt pattern that was the basis for this dress shirt was itself just a copy of an existing casual shirt (I copied it by tracing it with pins onto paper), and it worked well enough for the casual shirts I made from it. But, the dress shirt exercise has shown some flaws and I wonder if I should just start fresh with a new drawn-from-scratch pattern. That way I have solid reference lines and I can see all the steps to reach a point. I am tempted to fork out the money to purchase the Muller & Sohn men's shirt patterns because their trouser patterns worked so well for me, and all their drawings are to scale so it's easy to confirm calculations and readily see the modifications they make across styles. I also have the Don McCunn book which didn't serve me well in making trousers, but maybe his shirt pattern is better.
All in all this shirt is still fine for my purposes and I could probably tweak it for some improvements here and there but a nice fresh pattern is probably a better foundation for the long-term.