- Welcome to Bespoke Cutter And Tailor.
Recent posts
#11
Drafting, Fitting and Construction / Re: Linen jacket advice
Last post by jruley - July 03, 2025, 11:06:04 AMBack to the jacket, here's how it turned out:

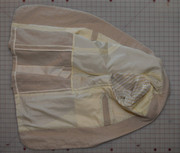
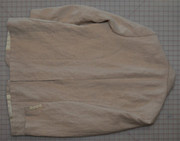
I went with the half lining, with a Hong Kong finish on the side, panel and back seams. Canvas ends at the front of the side pockets, you can see it peeking through the translucent lining. Used the lightest weight canvas from Bias Bespoke and it's quite comfortable, though I haven't had a chance to wear it out of the house yet.
I went with the half lining, with a Hong Kong finish on the side, panel and back seams. Canvas ends at the front of the side pockets, you can see it peeking through the translucent lining. Used the lightest weight canvas from Bias Bespoke and it's quite comfortable, though I haven't had a chance to wear it out of the house yet.
#12
Drafting, Fitting and Construction / Re: Adjusting for erect postur...
Last post by peterle - July 01, 2025, 07:02:30 PMIt's so much better than the last version and I think you are pretty near. The side seams are nice and straight and there is enough width across the thighs.
The back is a bit messy, also distorted by the pinning.
My approach would be: remove the pinning and sorting Out the right waistline at the back. To me the pattern you posted Shows a draft for braces and the triangle 20-22-23 is a braces extension. I would skip this and stay with 22-23. Install a second back dart when the waist line is too wide. To avoid the chevron shape at CB, AIM for a right angle at waistline/seatseam Point.
When the fitting Shows sagging I would pin or baste a horizontal dart across the butt taking out 2-3cm at the seat seam, fading out at the side seams( Like the alteration scetch you posted).
This will also reveal, wether the undersides are too wide and need further alteration.
#13
Drafting, Fitting and Construction / Re: Adjusting for erect postur...
Last post by Gerry - July 01, 2025, 04:37:47 AMQuote from: Robb on July 01, 2025, 04:24:38 AMQuote from: Gerry on July 01, 2025, 03:30:09 AMRobb, have you pinned the CB seam on the outside? ... pinning on the seam is not a good idea (assuming this is what you've done).Yeah that's what I did, I pinned the excess on the outside of the seam.
Unfortunately it's not very good for evaluation of fit. It would be best if you resew the CB and post pics before taking any further steps.
I appreciate your problems with the waistband. You could possibly take it a little higher at the back. That would probably require a little shaping of the CB seam though, right at the top of the seam. Think of it like an additional dart just below the waistband, about the same length as the actual darts.
Yes, that pattern adjustment is the one I was thinking of. My advice would be to leave that for now. Let's see where we stand with a cleaner CB seam (not pinned).

#14
Drafting, Fitting and Construction / Re: Adjusting for erect postur...
Last post by Robb - July 01, 2025, 04:24:38 AMQuote from: Gerry on July 01, 2025, 03:30:09 AMRobb, have you pinned the CB seam on the outside? ... pinning on the seam is not a good idea (assuming this is what you've done).Yeah that's what I did, I pinned the excess on the outside of the seam.
QuoteSpeaking of which, it dips down at the CB, suggesting that it is being pulled down (there are possibly drag lines there?) Though that could be something to do with your pinning (if that's what you did). I did say not to hoik things up too much in an attempt to resolve any folds below the leg, as tempting as that is.The waistband actually sits where it naturally sags to. Before sewing on the waistband I put on the toile and pinned a loose waistband around my waist and marked where it would sit and marked that off. Then sewed on the waistband at the normal top seam to compare. It more or less was the same as the front top seam but was 2 inches lower at the CB. So I pinned up.
QuoteThe waistband is also higher at the front than at the back. Try to even it up when viewed in profile.That is kind of the whole challenge I put myself in. I'm an ostomy patient so it can't really go lower in the front... I do have an idea to balance it out. I could cut the waistband at the sideseam and sew on a seat piece on the back to fill in the balance.
QuoteAs mentioned, folds below the seat usually require pattern manipulation. There are a number of ways to do this. The way I learned was to create a wedge under the seat, to shorten the length of the leg at the back. With a flatter backside (you possibly fall into that category), the wedge is taken higher up IIR. I'd have to dust off a book to check the details.I got this adjustment, is that the one you mean?
I'll have to rip apart the toile and adjust the pattern with a shorter CB and see how that will look.
#15
Drafting, Fitting and Construction / Re: Adjusting for erect postur...
Last post by Gerry - July 01, 2025, 04:12:05 AMPS The overall draft seems better.
#16
Drafting, Fitting and Construction / Re: Adjusting for erect postur...
Last post by Gerry - July 01, 2025, 03:30:09 AMRobb, have you pinned the CB seam on the outside? There's a peculiar ridge along it from the waistband down to the seat line. If so, then it's better if you re-sew the CB with your adjustment from the inside. You can machine-baste using a broad stitch-length and less tension so that the thread is easily removed (and don't back-tack) ... or do things by hand. Usually, you'd pinch out cloth either side of the seam-line and pin it, to get an idea of how much the CB needs taking in. Then carry out the alteration before posting. Darts, OK, you can pin those externally, but pinning on the seam is not a good idea (assuming this is what you've done).
As things stand, the CB is really scrunched up so it's difficult to assess. It's possible that you've pulled things a little too high into the waistband there and have given yourself a slight wedgie. Again, difficult to tell.
At this stage try not to get too obsessed by slight horseshoe folds. The pattern can be manipulated later to address those, if necessary. Just try to get a clean front and back with a natural looking waistline first. Speaking of which, it dips down at the CB, suggesting that it is being pulled down (there are possibly drag lines there?) Though that could be something to do with your pinning (if that's what you did). I did say not to hoik things up too much in an attempt to resolve any folds below the leg, as tempting as that is. The waistband is also higher at the front than at the back. Try to even it up when viewed in profile.
As mentioned, folds below the seat usually require pattern manipulation. There are a number of ways to do this. The way I learned was to create a wedge under the seat, to shorten the length of the leg at the back. With a flatter backside (you possibly fall into that category), the wedge is taken higher up IIR. I'd have to dust off a book to check the details.
There's also a convoluted pattern adjustment that reshapes the waistline at the back into a slight smiley. This pulls up the cloth vertically, but only in the middle of the panel, across the fullest part of the seat; it doesn't/shouldn't disrupt the balance at the CB or SS. I simply do this adjustment by eye, only you have to keep things relatively straight either side of the CB: if things are too scooped there the CB seam can get pulled up and we're back in wedgie territory. I would only dip down in the middle of the waist's seamline by about a quarter, too. That doesn't sound like much, but the result can be marked (in conjunction with the above wedge alteration). Any more than a quarter can cause vertical drag lines and/or tightness when bending. I'm sure you'll get other recommendations for this too, but that's for later on.
#17
Drafting, Fitting and Construction / Re: Defects and their remedies
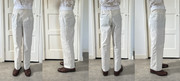
Last post by Robb - July 01, 2025, 01:46:07 AMIt's been some time since my last post but due time constraints progress was on hold.
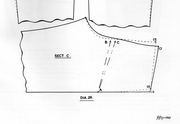
I've since made up a new draft. It's the pleated-top trouser from the revised edition of 'The Modern Tailor Outfitter and Clothier'. Since it's the first time making this specific one I first created a toile with little alterations to see how they will fit.
For the front:
Because I'm looking for more room in the front I thought it would be a good idea to add the adjustment for a stout figure provided with the instructions. But it's not giving me the result I want as it makes the waistband connect at an angle at the top of the fly, and giving me too much room at my waist level. So I'll revert to the normal fly line.
For the back:
There was too much cloth at CB so I went with Gerry's suggestion and pulled up the cloth into the waistband, about 2 inches and pinned it down. If I look at the side profile the draft lines look reasonably horizontal now doing that. (Without pinning, the lines angled towards the ground.) I'll have to hollow out the seat seam next time, for the terrible rear photo I had just pinned the excess fabric.
I'm not entirely sure what adjustment I should use for the front to give it more room whilst not distorting the pleat.
Appreciate the feedback.
I've since made up a new draft. It's the pleated-top trouser from the revised edition of 'The Modern Tailor Outfitter and Clothier'. Since it's the first time making this specific one I first created a toile with little alterations to see how they will fit.
For the front:
Because I'm looking for more room in the front I thought it would be a good idea to add the adjustment for a stout figure provided with the instructions. But it's not giving me the result I want as it makes the waistband connect at an angle at the top of the fly, and giving me too much room at my waist level. So I'll revert to the normal fly line.
For the back:
There was too much cloth at CB so I went with Gerry's suggestion and pulled up the cloth into the waistband, about 2 inches and pinned it down. If I look at the side profile the draft lines look reasonably horizontal now doing that. (Without pinning, the lines angled towards the ground.) I'll have to hollow out the seat seam next time, for the terrible rear photo I had just pinned the excess fabric.
Quote from: peterle on May 07, 2025, 01:46:24 AMA forward hip posture needs some adjustments: Generally the undersides are to be narrowed by slashing the center line and overlapping at the hip line and the fronts are to be widened by slashing and pivoting open by the same amount.Not entirely sure what you mean with that alteration? I'm only familiar with the adjustment of slashing at the hip line and lowering it at the seat, pivoting from the sideseam and doing the reverse for the front.
I'm not entirely sure what adjustment I should use for the front to give it more room whilst not distorting the pleat.
Appreciate the feedback.
#18
Drafting, Fitting and Construction / Re: Linen jacket advice
Last post by Hendrick - June 30, 2025, 08:51:51 PMYes. it's nice. I heard that the italian fashion comittee support "private initiatives" like blogs on the condition that their content has cultural relevance. That way even small museums and even schools can maintain blogs arount crafts instead of big, institutionalised websites...
Cheers, Hendrick
Cheers, Hendrick
#19
Drafting, Fitting and Construction / Re: Linen jacket advice
Last post by EvanTA - June 30, 2025, 08:34:12 PMQuote from: Hendrick on June 29, 2025, 08:19:56 PMI once went to see an exhibition on Gabriele D'Anunzio's impressive wardrobe:
https://trama-e-ordito.blogspot.com/2013/01/labbigliamento-di-dannunzio.html
There was a silk shirt that was made with french seams that were settled with tiny piqué stitches on the sides and undersleeve seams... quite beautiful indeed!
Cheers, Hendrick
This blog is quite a resource itself, looks like lots of interesting information in here. Thank you!
#20
Drafting, Fitting and Construction / Re: Linen jacket advice
Last post by Schneiderfrei - June 30, 2025, 02:42:40 PMI especially like that D'Annuncio had toes as long as his fingers!